What to consider before doing home insulation upgrades yourself
When’s the last time you upgraded your insulation? Never?
Insulation wears down over time, and it’s estimated that 90% of U.S. homes are under-insulated (1). That means it’s likely your house is due for an upgrade.
But lucky you—you’ve found the right corner of the internet.
At Sealed, we’re big fans of blown cellulose insulation for attics and walls.
It’s cost-effective, easy on the environment, and gets the job done far better than fiberglass—particularly when it comes to keeping your home warm in the winter and reducing your heating bills.
At first, blowing cellulose insulation into your attic may seem like the perfect DIY project.
It sounds simple: Go into your attic with a hose and blow insulation until it stands 15 inches tall. What’s so hard about that?
It turns out that properly insulating an attic requires a couple challenging steps before blowing the cellulose. And you might think twice before doing them yourself.
In this guide, you’ll cover:
- If DIY blown in insulation is the right project for you
- Pros and cons of DIY cellulose insulation
- Why it’s crucial to get your home’s insulation right
- How to get insulation and air sealing upgrades at no upfront cost
What’s involved in an DIY cellulose insulation project
There’s more to upgrading your insulation than meets the eye. Literally.
While most homeowners might assume all they need to do is roll out some fluffy pink batts or blow in insulation via a rental insulation blower, there are a few more steps involved.
And one of the most important steps is to find and seal up all the open gaps, seams, and holes before your insulation upgrade—but more on that below. (And that kind of detailed, highly technical work isn’t for everyone. Which is why so many DIYers skip this crucial step.)
Okay, let’s get to the overview.

Overview: Basic steps for a blown-in cellulose attic insulation upgrade
- Your attic space should be carefully measured to estimate the amount of materials needed, and then you’ll need to obtain all your supplies, including safety gear and equipment rentals.
- With safety measures in place, all your existing insulation should be removed and the attic and walls need to be cleared of debris. (If you find any pest droppings or nests or signs of moisture intrusion, you’ll need to remedy these issues before moving on to the next steps.)
- Once the space is clear, your entire attic space should be carefully and meticulously air sealed. Experts use a variety of supplies to do this, including spray foam, caulk, tape, and lighting and fixture covers.
- Next, you’ll need to install any needed vapor barriers and baffles in your attic space to ensure correct, healthy airflow and moisture protection. Now you’re finally ready to insulate!
- Set up your insulation machine and add the blown-in cellulose material, starting from the top and working your way down.
- Push the insulation into tight spaces and corners to fill every nook and cranny. (If you skip this step, you won’t get all the expected benefits from your insulation upgrade.)
- Fill your attic until the blown-in cellulose reaches the required R-value for your local climate and/or building code requirements.
- Clean up any excess insulation, remove all supplies, and clean your house. (There’s bound to be cellulose dust and debris peppered around after this project.)
Now that you have the outline of what’s involved, let’s really dig in.
Next, you’ll cover two of the most crucial steps that many DIYers miss when completing a blown-in cellulose insulation upgrade—and why they’re so important:
Air seal before you insulate
It’s critical to seal your attic’s air leaks before installing cellulose insulation.
By sealing the leaks in your attic, you can double the energy and comfort impact of blown in cellulose insulation.
For example, in our experience as home energy experts, we’ve found that the average home in the Northeast is 2 to 3 times as “leaky” as it should be, meaning Northeastern homes are exchanging outdoor and indoor air almost 3 times more than they should.
(It’s like leaving a window open in your house all year long. Talk about energy waste.)
And the majority of home air leaks are found in the attic—although you have them around your foundation, windows and doors, and plumbing and electrical fixtures, too.
At Sealed, we routinely find attic air leaks along top plates, around recessed lights, and in areas where wires and pipes enter the attic.
Air leaks alone can waste up to 40% of the energy you consume to heat and cool your home.
ENERGYSTAR.gov
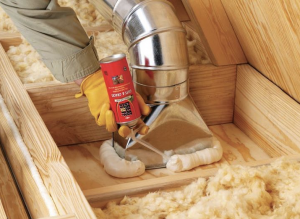
Air sealing is unfortunately painstaking and time-consuming work (not to mention very dusty).
When we air seal an attic space, our contractor partners typically install half a mile of foam, requiring 10 to 12 work hours spent on hands and knees in a cramped, uncomfortable space.
That’s a lot of sealing material!
Our contractor partners typically install half a mile of foam for professional air sealing alone, requiring 10 to 12 work hours spent on hands and knees in a cramped, uncomfortable space.
And that’s the work that’s done before new insulation is put in.
In case you’re wondering, it’s also a bad idea to blow insulation and then go back into the attic insulation to air seal.
Air sealing is difficult enough work without needing to dig through 15 inches of cellulose.
For more on air sealing (and why it’s so important to your home’s overall comfort and efficiency), check out the Sealed Guide to Air Sealing or learn How to find air leaks in your house.
Or for a quick visual on how air sealing and insulation work together, check out this video below:
Next up, let’s talk baffles.
Install baffles before you insulate
First, what the heck is a baffle?
Baffles prevent moisture accumulation in an attic by making sure that air is circulating properly.
The baffle does a few key things:
- Keeps the soffit vent clear of insulation, allowing air to flow freely
- Allows you to insulate as close to the vent as possible without obstructing it
- Directs air away from the insulation, preventing it from blowing around like confetti
Installing baffles incorrectly—or neglecting to install them when they’re needed—can lead to a serious mold problem in your attic.
Minor mistakes by an amateur can cause major problems, including possible moisture damage and health concerns due to indoor air quality issues down the road.
Minor mistakes by an amateur can cause major long-term problems.
Pros and cons of DIY blown in insulation
Still considering whether or not you’ll go the DIY route with cellulose insulation? Here are the pros and cons that you need to think through.
Pros of DIY cellulose insulation
- You’ll be able to complete the project on your own time. Doing the install yourself takes a lot of work, but it allows you to work on your own timeline.
- You’ll learn something new. Learning the correct ways to care for your own home can give you a strong sense of accomplishment and satisfaction in a job well done.
- You’ll save money on labor costs. Generally, this is usually the primary motivator behind DIY home upgrades. But remember, insulation and air sealing isn’t the same as installing new interlocking wood flooring or building an IKEA kitchen. If you get this project wrong, it can have serious implications for your home and even your health.
Cons of DIY cellulose insulation
- Insulation upgrades are time-consuming projects. We’re talking about weeks of work here if you’re doing this all on your own.
- You’re unfamiliar with the safety risks and proper safety measures. Cellulose is a safe material to insulate your home with, but any insulation project comes with safety risks when you’re exposed to chemicals, dust, and debris. Trained professionals know how to protect themselves for each step of the process.
- You won’t get professional results. You may not be looking for professional, expert-level results if you’re seeking the DIY route, but when you go to sell your home, prospective buyers might.
- You’re missing out on specialized knowledge and skills. One of the best things about working with an expert is, well, they’re an expert. You can trust in their knowledge and years of experience. And working with an experienced insulation contractor can help you understand if there are other key areas of your home that require fixes to get the energy and comfort results you’re looking for.
- DIY insulation projects may not qualify for financial incentives, like rebates. Some home energy upgrades require a certified contractor to complete the work to be eligible for federal, state, or local utility incentives.
Insulation and air sealing isn’t the same as installing new interlocking wood flooring or building an IKEA kitchen. If you get this project wrong, it can have serious implications long-term.
The Verdict: Should you DIY blown in insulation?
The truth is a botched DIY cellulose insulation job can cause serious problems in the long-run.
While blowing cellulose in an attic isn’t terribly complicated, it needs to be done in combination with proper air sealing and correctly installed baffles.
While it might seem like we’re biased, we’re not the only ones who caution against going this route.
For a good laugh (and trustworthy advice) check out this vintage YouTube video called Grandma’s House: A Tale of Weatherization supported by Energy.gov for an entertaining look at insulation and air sealing gone wrong.
Overall, it’s not recommended that you take on an attic insulation project as an inexperienced—or even intermediate—DIYer. (Tap here to learn if you should insulate your crawl space, too.)
While we’re all for putting in the elbow grease that’s required of homeownership, you really should know what you’re doing to get your insulation upgrade right the first time.
Insulation and air sealing upgrades help control and retain healthy airflow throughout your entire home.
Insulation and air sealing upgrades help control and retain healthy airflow throughout your entire home.
When they’re done incorrectly, you won’t experience the energy savings and comfort you were hoping for by completing the project at best.
And at worst?
You’ve now created a moisture and health problem in your home that needs expert remediation and possible costly future repairs.
However, at the end of the day, it’s your home.
If a DIY home insulation project is what you’re set on, make sure you’re highly educated in what’s required before you begin.
And if you run into issues or have questions while working, stop and contact an insulation expert. It’s definitely better to be safe than sorry!
But if it were our house? (And if we weren’t insulation experts?) It’s better to get the whole attic air sealing and insulation upgrade done professionally than to install only blown cellulose by yourself.
And thankfully, there are insulation rebates, energy efficiency tax credits, and even incentives from utility companies to make these improvements more affordable.
Expert insulation and air sealing upgrades at no upfront cost
We believe homeowners should be able to get home comfort and energy efficiency improvements without hassle—and without draining a bank account.
You could cut up to 50% of your energy use when getting high-performance insulation, professional air sealing, and heat pump HVAC upgrades with Sealed. Learn how.
And we stand by our work, too—we stay accountable to the results. If your energy upgrades don’t save energy, we take the hit.
To see if you qualify for high-performance insulation and professional air sealing at zero upfront cost, take our quick (and fun!) quiz.
If I don’t have to spend any extra money to get a huge improvement to my home, it’s just a no brainer at that point.
Scott. R, Sealed customer
