You probably don’t think about your crawl space often. But here’s when you should.
Crawl spaces are often overlooked and easily forgotten—until there’s a problem.
Ensuring your crawl space is properly insulated is an absolute game changer for your home’s comfort levels, energy efficiency, and your overall health.
At Sealed, we’ve seen insulation upgrades transform the way a house feels (especially if you live in a house that just never stays warm). Plus, you could get top-to-bottom home insulation—eligible energy rebates included—with the Sealed energy-savings guarantee and flexible payment options. Find out how.
But let’s get into it: Insulating your crawl space really does matter, so let’s make sure it’s done right.
Table of contents:
- Can you insulate a crawl space?
- Should floor joists in a crawl space be insulated?
- How to tell if your crawl space needs an insulation upgrade
- How to insulate your crawl space
- Does insulating a crawl space cut energy waste?
- Discover how to cut energy costs and fix your crawl space with guaranteed results
Can you insulate a crawl space? Yes. Here’s why you should.
First let’s make sure we’re talking about the same thing!
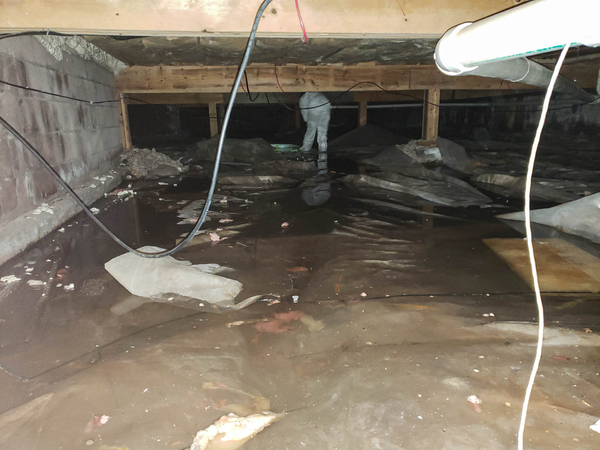
A crawl space is under your house: It’s a narrow space that acts as a buffer between the subfloor and the ground underneath. Crawl spaces are usually between one to three feet in height and are often left unfinished.
And by “unfinished” we mean dirt floors, cinder blocks, and—here’s the real problem—inadequate insulation (or no insulation at all!).
Not every house has a crawl space, and not every crawl space runs along the entire square footage of a house, but in general crawl spaces look like this:
(Worthwhile read: The best home heating system types)
Yeah, not too pretty, huh? Crawl spaces are essentially an open invitation for moisture and humidity to creep in, which can cause a barrage of unwanted issues like mold, musty odors, and potential structural damage.
And an under-insulated or non-insulated crawl space lets cold air drafts in during winter, welcomes warm air in summer, and generally thwarts your efforts to keep your energy bills down and your home comfortable.
Clearly, properly insulating your crawl space will cut energy waste year round, but what about those floor joists? We get that question a lot…
Sealed did a great job with insulating my home. The drafts are gone which makes the house more comfortable and warmer.
John B., Sealed customer
Should floor joists in a crawl space be insulated?
The answer? Absolutely. Joists are the horizontal beams that support the sub floor in your crawl space. Left uninsulated, they form direct pathways for the movement of outside air—hello, heat loss and freezing winter floors!
Insulated floor joists are important for maintaining a consistent temperature in above living spaces, reducing energy consumption for heating and cooling, and protecting pipes from freezing in cold temperatures.
(Related read: How to heat a large old house efficiently)
How do you know if your crawl space needs to be insulated?
If you’ve been hanging around Sealed for any length of time, you know that there are plenty of places for unwanted outside air to get in.
(Learn all about air sealing and outside air intake here.)
But how do you know if your crawl space is contributing to outdoor air getting in?
Here are three of the best ways to tell:
1. The eyeball test
Grab your flashlight, put on your worst clothes, and give your crawl space a thorough once-over.
Keep your eyes peeled for damaged, sagging, or deteriorating insulation. (And just to warn you: spiders like crawl spaces, so you might want a broom to sweep away those sticky cobwebs.)
Any insulation that’s falling apart or showing signs of moisture damage is likely silently screaming for your immediate attention. Sadly, once insulation decays or gets wet, there’s really no saving it. You’ll have to spring for a replacement.
Don’t see any insulation? Looks like you have an answer.
Once insulation decays or gets wet, there’s really no saving it. You’ll have to spring for a replacement.
2. Floor check
Pay close attention to how your floor feels. If your floors seem really cold in the winter—or if there’s a temperature difference between floors in different rooms—chances are your crawl space insulation isn’t doing its job.
Also if your floor (or subfloor) is warping or creaking a lot, that’s a pretty good indication that they aren’t being properly protected by the insulation beneath.
Drastic temperature differences cause the wood to expand and contract too quickly, and your floor will squeak to complain about it.
(By the way, if your basement is suspiciously chilly, here’s a good read about how to make your basement warmer.)
3. Professional help
Here’s the thing: Sometimes a crawl space problem is hard to detect. (Especially if you don’t feel like crawling around on your hands and knees. In the dark. With the spiders.)
The trick here is to call in an expert that’s skilled in diagnosing whole-house problems—and fixing those problems with whole-house solutions.
If you’re going to pay for a fix, you definitely want to make sure the problem is… you know, fixed.
Okay, let’s say you’ve determined that your crawl space needs an insulation upgrade.
Here’s how to upgrade your crawl space insulation.
TKHow to insulate your crawl space
Insulating your crawl space might seem daunting… and, we’ll be honest, it is.
Swapping out insulation in a crawlspace is a gross job. It requires strategic planning, long hours on your knees in the grubbiest part of your house, and a tolerance for spotting signs of crawl-space ghosts.
It’s one of those DIY projects that can easily balloon out of control, so we recommend bringing in a pro if you can.
Sealed… coordinated the process of removing the inefficient, old insulation and installing the new. Our home is now noticeably warmer and more comfortable.
William K., Sealed customer
That said, if you want to give crawl space insulation a go, here’s what you’ll need to do.
Insulating a crawl space—step by step
Now that you’ve decided to DIY, it’s time to get cracking on the project!
Here are the steps you’ll need to take:
- Choose insulation materials
- Remove old insulation
- Dry out the whole area
- Seal all air leaks
- Install a plastic vapor barrier
- Install the insulation—correctly
- Get professional help if needed
Okay, let’s get at it:
1. The best crawl space insulation materials and types—a quick guide
So what’s the best insulation on the market for crawl space walls? We love spray foam for its dual insulating and air-sealing properties, but every house is different.
There are several types of insulation, but the most common are:
- fiberglass batt insulation
- blown-in cellulose
- rigid foam board insulation
- closed-cell spray foam insulation
Each type has its own pros and cons, and you’ll need to be sure you’re picking the right R-value for your situation and climate. (Get a full insulation education in our guide to attic insulation, which covers the different types in detail.)
The quick overview, though?
Fiberglass batts are generally the most affordable option, but be wary here: They can be less effective in the crawlspace (and are more prone to mold growth!) than your other options.
For instance, our team of experts would almost never recommend fiberglass batts or blown-in cellulose on their own in a crawlspace. They would need to be covered with rigid foam (with board seams taped) in order to prevent the insulation from soaking up moisture like a sponge.
We also would not typically recommend a combo of both spray foam and rigid foam board insulation; our experts would usually recommend one or the other since both have the air sealing properties, which is typically needed in a crawlspace.
The huge caveat here is that this is generalized advice. Every house is different. All of Sealed’s installs are completely custom depending on each house’s unique needs, so if another strategy will work better for your house, we’d definitely let you know.
2. Remove old insulation
Should you remove insulation from the crawlspace? Yep. In fact, it’s essential to remove any old or damaged insulation from the crawlspace before you do anything. Old insulation can harbor mold or mildew and water damage and may not provide adequate protection against air leaks and moisture.
By the way, be sure to wear protective clothing such as gloves, dust masks, and eye goggles when removing old insulation. You don’t want any of that stuff in your eyes or lungs or on your skin.
It’s essential to remove any old or damaged insulation from the crawlspace.
3. Dry out the whole area:
It’s likely that your crawl space has seen its fair share of dampness or water intrusion. As you remove the old insulation, you might notice water spots or mold and mildew that you couldn’t see before. (Definitely need to reseal your crawl space if this is the case.)
Before installing the new insulation, it’s critical that you dry out the entire area. Use fans, dehumidifiers, and heaters if necessary. Sometimes putting in a drainage system and sump pump is the best bet to keep excess water out and the crawl space dry, but that’s usually only necessary if you see standing water after it rains.
4. Seal air leaks
When it comes to energy loss, one of the biggest culprits in your home are air leaks—and this is especially true when it comes to your crawl space.
Air leaks in and around your crawl space and foundation can cause drafts and drastically affect the temperature in your living spaces. And if air leaks are present, chances are water leaks are too, which, as we mentioned, can cause mold, mildew, and a muddy mess (not to mention structural damage!).
To prevent this, use sealant for the water leaks first, then caulking or spray foam insulation to seal those air leaks
(Learn more about how to find air leaks in your home—but keep in mind that this will be a tricky DIY task in the crawl space because of the lack of visibility.)
5. Install a plastic vapor barrier:
The next step is to install a vapor barrier on the crawl space floor.
This is a big job, but it’s important! A plastic vapor barrier (also known as a vapor retarder) will help prevent ground moisture from causing structural damage or getting into your house and causing mildew and mold growth (1).
The best material for a vapor barrier is polyethylene plastic sheeting, which should be laid out and then taped together with plenty of overlap.
6. Install insulation—correctly
Once you have chosen the right type of insulation for your crawl space, it’s essential to install it correctly. This often depends on the type of crawl space you have and if it’s correctly vented or not. (The best way to know if it’s vented correctly is to have a professional take a look.)
Either way, you want complete coverage wherever you’re insulating! The insulation should fit snugly between the crawl space joists and should be secured well—though not too tightly— around pipes, ductwork, electrical wiring, and other obstructions (2).
In case it’s not obvious, this is another step during which it’s important to suit up: mask, protective clothing, goggles—the whole enchilada.
7. Get professional help if needed
We can’t emphasize this enough: Upgrading crawl space insulation is extremely challenging and time-consuming, especially if you’re not a regular DIYer. It’s highly technical work.
If you’re unsure about any aspect of the job—or if you feel exhausted just thinking about crawling down there (or you’re scared of spiders!)—it’s best to call in the professionals. They know how to do the job well.
(And if you go with Sealed, you can even get an energy-savings guarantee on your home energy upgrades, like crawl space insulation.)
Okay, so that’s the high-level view of insulating a crawl space.
But before we close this out, let’s briefly look at a pretty important topic: Is all of this even worth it? Will insulating a crawl space really make a difference?
The answer is—yes. But it’s a little more nuanced than that.
How to think about insulating a crawl space: It’s one piece of the puzzle
Insulating a crawl space is a worthy investment—full stop.
In fact, it’s one of the more effective energy-efficient home improvements you can make.

Especially if you’re looking to make your house more comfortable. (In other words… if your family is constantly complaining about cold floors in the winter.)
But! It’s essential to understand that fixing your crawl space won’t necessarily solve all your home comfort and efficiency issues by itself.
Making sure that air isn’t getting into your house through your crawl space is just one slice of the delicious home-performance pie.
It’s important to note: You could cut up to 45% of your energy waste in your existing home with the right top-to-bottom air sealing and insulation upgrades (3).
The other ingredients for this home-performance pie?
- Air sealing the rest of your house (so that unwanted air isn’t sneaking in elsewhere).
- Insulating your attic.
- Making sure the ventilation in your house is designed properly.
- Upgrading your HVAC system to one can actually handle your home’s specific needs and minimize energy waste
Each ingredient is important, and they all complement one another.
And to get the best home comfort and efficiency—and the most out of your investment—you need to make sure they’re all present.
Cut up to 45% of your energy waste in your existing home with the right top-to-bottom air sealing and insulation upgrades.
Insulation Industry Opportunity Study
But that sounds pretty intimidating. How do you do all that?
How do you find the right professional, coordinate the project, figure out the funding, make sure you’re getting all the home energy rebates you’re eligible for, and make sure it was done correctly… without getting completely overwhelmed in details and paperwork?
Well! You’re in the right place.
Cut energy costs and fix your crawl space with Sealed. (We guarantee your results.)
Upgrading your crawl space (or your entire home) is complex and stressful, and making sure it’s done right the first time can be a headache.
That’s where Sealed comes in. With Sealed…
- The whole upgrade process is hassle free. We make the whole-home comfort upgrade process hassle free—including a free energy assessment and flexible payment options.
- We’ll do the heavy lifting and paperwork. We vet the best home performance contractors in your area, matching you with the right one based on their expertise and the unique needs of your house.
And we meticulously research what upgrade rebates your project might be eligible for—and lead the way in helping you understand what’s available. - The upgrades will work. Your house will become a comfortable, energy-efficient marvel. (We 100% stand by our work.) You get to sit back and enjoy hassle-free home upgrades that make your house feel better year round.
Fill out our quick questionnaire to see if your house qualifies to work with Sealed and our famous Sealed energy-saving guarantee.
Sealed guided me through the process of adding spray-foam insulation to my home. [They were] very open and honest about how the program worked and were able to provide all the information I was looking for.
Blaise B., Sealed customer